There are three main dialogs for editing preferences and other user-defined settings: Preferences, Style Configurator and Shortcut Mapper. The Shortcut Mapper is a list of keyboard shortcuts to everything that can have one in Notepad++. Style Configurator allows changing the visual appearance of anything that has a color or a font. The Preferences dialog manages most other user-settings. While there are various aspects in Notepad++ that are not configurable, you may not even notice them.
For settings not covered by the three main dialogs, there are other toggles and settings which can be found in various dialogs, menus, and configuration files.
As noted in the Configuration Files documentation, Notepad++ writes the configuration files when it exits, which means that, when you make a change using Notepad++ menus and dialogs described below, your change will not be written to the configuration file until Notepad++ exits.
Preferences
For the descriptions below, if it’s a checkbox ☐, the description applies if the checkbox is checked. For options where the opposite behavior might not be obvious, it may also explicitly describe what the unchecked behavior is. (Checkbox states will be referred to as “checked” or “checkmarked” or “option XXX is on” for ☑, “unchecked” or “uncheckmarked” or “option XXX is off” for ☐, and “disabled” when it’s greyed out so that you cannot toggle the state of the checkbox, and “enabled” if the grey has been removed.)
If the “default” state of an option is described, it means the state that the option would be in when Notepad++ is first installed, without any settings changes. If you have upgraded from a previous version of Notepad++, and had customized a particular option, your customized choice should not be overwritten.
General
These affect the user interface (localization, toolbar, tab bar, and more). In v8.8, the Toolbar and Tab Bar sections were separated to their own sections.
- Localization:
- [pulldown]: Set the language for the Notepad++ user interface.
- This copies one of the XML files from the
localization\folder tonativeLang.xml. - To make changes to your localization, edit the language file
localization\<languagename>.xml, as per the instructions in the Binary Translation section. - NOTE: After making changes to the XML file in the
localizationdirectory, or after upgrading to a new version of Notepad++, you need to refresh thenativeLang.xml: use the Localization drop-down to change the Localization to another language then change it back immediately to your preferred language, or skip the “another language” step and just click on the preferred language – either way ends up with copying the file tonativeLang.xmland immediately updating Notepad++'s text for menus and dialogs. (Unlike many configuration files, exiting Notepad++ and restarting the application will not bring in the new settings from an editedlocalization\<languagename>.xml; you must re-choose the desired Localization for the changes to be applied.) - NOTE: After changing the Localization in this Preferences dialog, certain translatable strings, like the tooltip/hover text in dialog boxes, will not refresh until Notepad++ is restarted. If it ever looks like your Localization didn’t fully activate, try exiting all instances of Notepad++ then restarting the application.
- This copies one of the XML files from the
- [pulldown]: Set the language for the Notepad++ user interface.
- Menu
☐ Hide menu bar (use <kbd>Alt</kbd> or <kbd>F10</kbd> key to toggle): Sets the main menu bar (File, Edit, Search, …) invisible; once invisible, it can be made temporarily visible by using the Alt or F10 key.☐ Hide right shortcuts + ▼ ✕ from the menu bar (Need to restart Notepad++): Makes the + ▼ ✕ resources invisible (new to v8.4.5). Use this if you find the menu bar too “cluttered”, or find those commands redundant. Notepad++ must be restarted after checkmarking this option in order to see these; in v8.7.6, they can be hidden immediately (in prior versions, hiding them also required re-starting).
- Status bar:
☐ Hide: Without checkmarking this option, there will be a status bar along the bottom of the Notepad++ window showing information about the current document. The status bar will be hidden when this option is checkmarked.
- Document List Panel: (This section removed in v8.1.5.)
☐ Disable extension column: Prior to v8.1.5, if checked, the Document List panel will not have the second column showing extensions (instead, the extension will be part of the Name column); in v8.1.5, this is controlled by right-clicking in the headers of the Document List panel.☐ Show: Prior to v8.1.3, this checkmark would toggle the Document List panel; in v8.1.3 and after, this is now controlled by the View menu’s “Document List” entry.
Toolbar
These settings affect the appearance of the Toolbar. (Before v8.8, these Toolbar settings were a section of the General settings above.)
☐ Hide: The icon-based toolbar will be hidden.- There is a radio-button set of choices for the icons (updated v8.0.0):
Fluent UI: small: Uses small versions of the Fluent UI icons.Fluent UI: large: Uses large versions of the Fluent UI icons.Filled Fluent UI: small: Uses small versions of the Fluent UI icons, in a filled (or reverse-video) style.Filled Fluent UI: large: Uses large versions of the Fluent UI icons, in a filled (or reverse-video) style.Standard icons: small: These are the small version of the traditional (pre-v8.0.0) icons.
In v8.8, a new section was added, for being able to change the colors of the Fluent UI icons:
- Colorization:
☐ Complete: All the foreground in the Fluent UI icons are given the selected color.☐ Partial: (default) Highlights in the foreground in the Fluent UI icons are given the selected color, but the rest of the foreground is black.- Color choice:
- The named colors will set the icon foreground color.
☐ Default: Icons will be black whenCompleteis selected, or use blue highlights whenPartialis selected.☐ System Accent: Will use the Windows OS’s system accent color. (The (?) hover text explains how to use Windows Settings > Personalization > Colors to select the system accent color.)☐ Custom: Use a standard Windows color dialog to choose any RGB color desired.
Tab Bar
These settings affect the appearance and behavior of the Tab Bar. (Before v8.8, these Tab Bar settings were a section of the General settings above.)
☐ Hide: The tab bar for the open files will not be visible.☐ Vertical: Have the tabs on their side on the left, rather than along the top.☐ Multi-line: If there are enough tabs, they will wrap to a second line.☐ Lock (no drag and drop): Prevent the reordering of tabs by drag-and-drop on the tab bar (unselected, drag-and-drop on the tab bar will reorder tabs).☐ Double click to close document: Allows double-clicking on the tab to close the file.☐ Exit on close the last tab: If the last tab is closed, Notepad++ will exit (unselected, Notepad++ instead has one new file open).☐ Reduce: Make the tab bar vertical region and font size smaller.☐ Alternate icons: Change the “saved”/“edited”/“read-only” icons from blue/red/grey disk-icons to checkmark/pencil/lock symbols, respectively- The alternate icons option is designed to improve the user experience for visually-impaired users, and any who prefer different symbols rather than different colors to distinguish the status of each file.
- Note: In Dark Mode, the “saved” symbol (either the blue disk or the green checkmark) will not be shown; the “edited” and “read-only” icons will be.
☐ Change inactive tab color: Change the background on inactive tabs to the color defined by Global Styles > Inactive Tabs > Background Colour.- Note: If this setting is not checkmarked, the chosen background color for inactive tabs will be ignored, and the active tab’s background color will be used for inactive tabs instead.
- In v8.7.2 and newer, hovering over an inactive tab will highlight that tab, as described in User Interface > Tabs.
- Previously named
Darken inactive tabs
☐ Draw a coloured bar on active tab: Indicate the active tab by adding a colored bar.☐ Show close button: Add the close button to each tab’s entry on the tab bar.- In v8.7.6 and newer, if the option is checkmarked, Notepad++ shows the close button on the active tab or on all tabs (depending on
☐ Show buttons on inactive tabsbelow); when this option is not checkmarked, no tabs show the close button - In v8.7.2-8.7.5, it was
Show close button on each tab, and it caused the close button to be hidden for inactive tabs, but can be made visible by hovering over the tab, as described in User Interface > Tabs.
- In v8.7.6 and newer, if the option is checkmarked, Notepad++ shows the close button on the active tab or on all tabs (depending on
☐ Enable pin tab feature: Enables ability to “pin” tabs; see User Interface > Tabs for details. (new in v8.7.2)☐ Show only pinned button: When the pin tab feature is on and this setting is on, the “pin” icon will only be shown when it’s pinned, but not shown when it’s not pinned. If this setting is off, a gray pin will be visible when the tab is not pinned. When the pin tab feature is off, this option will be grayed out. (New in v8.8)☐ Show buttons on inactive tabs: When checkmarked, the close button and pin tab icons will always be visible on all tabs, whether or not the tab is active (if their respective options, above, are also checkmarked); when not checkmarked, the close button and pin tab icons will be hidden on inactive tabs, and only visible on active tabs or when hovering over inactive tabs.
Editing
Starting in v8.6.3, the Editing section in the Preferences dialog was split into Editing 1 and Editing 2. There was more re-arrangement in v8.6.5; check both tabs if you are having trouble finding a setting mentioned in one of those two groups of settings.
Editing 1
These influence editing (carets, code-folding, line wrapping, and more).
- Current Line Indicator: Determines how the current line will be indicated.
☐ None: No indicator for which line is the current line.☐ Highlight Background: Indicate the current line by highlighting the normal background color with the Settings > Style Configurator > Global Styles > Current line background color style’sBackground colour.☐ Frame: Indicate the current line by drawing a rectangle frame around the text of the current line, using the color defined by Settings > Style Configurator > Global Styles > Current line background color style’sBackground colour, and with the rectangle-line thickness defined by the Width slider.- Width: Use a slider to set the width (in pixels) for the lines of the rectangle frame for the current line.
- (In v8.4 and earlier, this multi-control section was just listed as
☐ Enable current line highlightingin the list of checkboxes, and was the equivalent of☐being None and ☑ being Highlight Background.)
- Caret Settings:
Width: [pulldown] Sets the width and shape of the typing caret:1,2,3: Width (in pixels) of the vertical-bar-style typing caret.0: Width of caret is 0 pixels, which means there is no visible caret.Block: The caret will be a full-character-width rectangle; while typing, the caret block will appear where the next character will be typed; while selecting text, the caret block will be on the last character of the selection (so if you have textABC:and select fromAtoC, the caret block will be on theC).Block After: The caret will be a full-character-width rectangle; while typing, the caret block will appear where the next character will be typed; while selecting text, the block will be after the character position of the selection (so if you have textABC:and select fromAtoC, the caret block will be on the:).
Blink Rate: [slider] Adjust the rate at which the caret blinks, faster when moved left (F), slower when moved right (S).
- Line Wrap: Sets how lines will be wrapped (when View > Word Wrap is checked)
☐ Default: Wraps from the last visible column to the first visible column.☐ Aligned: Wraps from the last visible column to the same indent as the start of the unwrapped line.☐ Indent: Wraps from the last visible column to the next level of indent compared to the start of the unwrapped line.
☐ Enable smooth font: Enables a font-smoothing algorithm from Windows, which may affect how smooth fonts are on some displays.☐ Enable virtual space: Enables putting the caret beyond the end of the line (new to v8.4.3). (Read more about this feature in Editing > Virtual Space.)☐ Make current level folding/unfolding commands toggleable: Enables the feature that causes the View menu‘s Collapse/Uncollapse Current Level commands to both toggle the state of folding for the current level (so doing the command twice will undo the action); when not checkmarked, the Collapse will only cause the current level to fold, and Uncollapse will only cause the current level to unfold (new to v8.4.2).☐ Enable scrolling beyond last line: Allows you to scroll (with scroll bar or mouse wheel) so that up to a page of blank space after the last line is visible. (When unchecked, scrolling to the end will put the last line of text as the bottom line in the window, when there are more lines of text than are visible in the window.)☐ Keep selection when right-click outside of selection: Prevents right-click from canceling an active selection.☐ Apply custom color to selected text foreground: Allows the foreground color to be specified in Settings > Style Configurator > Language:Global Styles> Style:Selected text colour, rather than just the background color. (New to v8.8. Replaces the old zero-byte config fileenableSelectFgColor.xml.)☐ Disable advanced scrolling feature (if you have touchpad problem): designed to help if you have a problem with your touchpad.☐ Enable Copy/Cut Line without selection: When checkmarked, will allow the Context Aware Copy/Cut feature to have Copy/Cut shortcuts work with the whole line if there is no active selection. When it’s not checkmarked, doing a Copy or Cut without a selection will not affect the text or clipboard. (New preference in v8.6.3.)
Editing 2
- Multi-Editing:
☐ Enable Multi-Editing (Ctrl+Mouse Click/Selection): Allows multiple selections not necessarily contiguous with each other by using Ctrl+Mouse click on the selection(s). (This option was in Editing preferences originally; it was removed in v8.6-v8.6.2; but it returned in the new Editing 2 preferences in v8.6.3.)☐ Enable Column Selection to Multi-Editing: When checkmarked, a Column Selection will be converted into a Multi-Selection to give added power. When not checkmarked, Column Selections will be independent of Multi-Selections, so it will behave more like v8.6-and-earlier, or v8.6.1-8.6.2 with thenoColumnToMultiSelect.xmlconfig file. This can only be checkmarked if☐ Enable Multi-Editingis also checkmarked. (New preference in v8.6.3.)
- EOL (CRLF): Changes the rendering of the
CR,LF, andCRLFcharacters when View > Show Symbol > Show End of Line or Show All Characters is checked:- Default: Old behavior (
CRandLFin reverse-video boxes) - Plain Text:
CR,LF, andCRLFlook like normal text. - Custom Color: Opens the Style Configurator dialog to edit Global Styles > EOL custom color
- Default: Old behavior (
- Non-Printing Characters: Changes the rendering of the Non-Printing Characters when View > Show Symbol > Show Non-Printing Characters or Show All Characters is checked:
- Abbreviation: The symbol will use the abbreviation value from this table, such as
NBSPfor the “no-break space”. - Codepoint: The symbol will use the codepoint value from this table, such as
U+00A0for the “no-break space”. - Custom Color: Opens the Style Configurator dialog to edit Global Styles > NPC custom color
- Apply to C0, C1 & Unicode EOL: Applies these Non-Printing Characters settings to the C0 and C1 control codes as well as the Unicode “End of Line” characters for LINE SEPARATOR (U+2028:
LS) and PARAGRAPH SEPARATOR (U+2029:PS) ☐ Prevent control character (C0 code) typing into document: When checkmarked, if you hit a keyboard sequence like Ctrl+E which is not mapped to a shortcut, it will not enter the ASCII control character equivalent. With this uncheckmarked, the ASCII control character will be entered (and may be invisible, depending on your control-character settings here and in the View > Show Symbol > menu. (New preference in v8.6.5.)
- Abbreviation: The symbol will use the abbreviation value from this table, such as
Dark Mode
The Dark Mode feature (added in v8.0.0) is controlled here.
☐ Dark Mode/☐ Light Mode/☐ Follow Windows: Chooses whether to use Dark Mode, Light Mode, or follow the Windows Dark/Light settings. (Prior to v8.4.8, this was a single☐ Enable Dark Modecheckbox)- When you enable Dark Mode:
- it will change the active theme to your previously-selected Dark mode theme (new to v8.4.8; previously it always switched to
DarkModeDefault)- Reminder: changing the theme does not change your UDL colors, as discussed in the UDL and Themes section. If your UDL was colored to match some other theme, the colors will likely mismatch, and you will need to edit the UDL colors to make it match the DarkModeDefault theme.
- it will change the coloring of the menu bar and toolbar (if visible)
- Note: In v8.0 - v8.1.1, you must exit Notepad++ completely and restart for full Dark Mode. In v8.1.2 and newer, that is no longer necessary.
- it may change your General > Toolbar settings to use one of the Fluent UI icon sets: if you already had a Fluent icon set selected, it will keep it; if you had the Standard icons: small selected, it will change to Fluent UI: small icons. Starting in v8.4.8, it will remember this the next time you switch to Dark Mode.
- When you run in Dark Mode, the saved-file icon will not show up on your Tab Bar, whether or not you have Alternate Icons checked. However, a read-only file or an edited file will still show their icons (either different colored disks, or the lock icon and pencil icon, depending on Alternate Icons setting).
- it will change the active theme to your previously-selected Dark mode theme (new to v8.4.8; previously it always switched to
- When you enable Light Mode:
- it will change the active theme to your previously-selected Light Mode theme (new to v8.4.8; previously it always switched to
Default (stylers.xml))- Note: prior to v8.4.8, this was true even if you previously had a different theme selected before trying out Dark Mode. In older versions, if you would like a different theme, you will have to manually change to that theme after changing from Dark Mode to Light Mode.
- it will change the coloring of the menu bar and toolbar (if visible)
- Note: You must exit Notepad++ completely and restart in order to get the rest of the UI (like the top title bar) to be fully out of Dark Mode.
- Prior to v8.4.8, it would leave your Toolbar settings with the same icon set as you had when you were in Dark Mode
- it will change the active theme to your previously-selected Light Mode theme (new to v8.4.8; previously it always switched to
- Notepad++ will track Settings > Preferences > General settings for the Tool Bar and Tab Bar separately for Light Mode and Dark Mode, as well as Settings > Style Configurator > Theme to allow you to have different tool bar icons or tab bar settings and themes in the different modes, so you can switch between them without having to manually make those changes (new to v8.4.8)
- When you enable Dark Mode:
- Tones: allow you to change the tone of the Dark Mode (new to v8.1.2)
- Note: Dark Mode Tones affect most of the user interface, including main menus and toolbars and most of the dialogs, as of v8.1.3. (In v8.1.2, the Tones affected the menus and the Find/Replace/Mark dialog, but not the other dialogs.) The menu pulldown controls, as well as Windows-defined dialog boxes like Open and Save, have their colors defined by operating system settings, and Notepad++ Dark Mode settings will not affect them.
☐ Black,☐ Red,☐ Green,☐ Blue,☐ Purple,☐ Cyan,☐ Olive=> The dark color has a hint of that colored tone☐ Customized=> allows you to configure the tones of the individual components of the Dark Mode (even to the point of not being Dark anymore):Top=> choose the color of the menu bar and tool barMenu hot track=> choose the color of the active menu bar entryActive=> choose the color of the active tab on the tab barMain=> choose the color of the inactive tab(s) on the tab bar, as well as background colors for most dialog boxesError=> choose the color for the error indicator on the Incremental Search barText=> choose the color for the menu bar entry names, and other normal text for most dialog boxesDarker text=> choose the color for the darker text for most dialog boxesDisabled text=> choose the color for disabled items in most dialog boxes (often referred to as “greyed out” or “disabled”)Link=> choose the color for link text in dialog boxes (for example the hyperlink URL in the User Defined Languages dialog) (new to v8.1.3)Edge=> choose the color for the vertical separator bars on tab bars (in the main window and in dialogs), and other edges (like the boxes around color selectors)Edge highlight=> choose the color for the border of a highlighted controlEdge disabled=> choose the color for the border of a disabled control- Reset ⏷: (New to v8.6.9)
- Clicking the text side of the button will reset the Customized tone to the default Black tone settings.
- Clicking the pull-down arrow ⏷ on the button will give you a menu to select one of the built-in tones: when you pick a name, it will then reset the Customized tone to the chosen name’s tone settings. For example, if you mostly want the Olive tone, but you want to change the
Linkcolor from yellow to bright green, you can select the Customized tone, Reset ⏷ toOlive, then change theLinkcolor.
Margins/Border/Edge
These define the margin style, border width, and edge settings.
- Fold Margin Style: If the active Language lexer allows for code folding, these determine
☐ Simple: Shows a-if that section is not folded, or a+if it is.☐ Arrow: Shows a▼if that section is not folded, or a▶if it is.☐ Circle tree: Shows a⊖with a line to the end of the section if that section is not folded, or a⊕if it is folded.☐ Box tree: Shows a⊟with a line to the end of the section if that section is not folded, or a⊞if it is folded.☐ None: Shows no symbols and hides that column, even for lexers that allow code folding.- The View menu folding commands still work, even when the Folder Margin Style is set to None.
- Border Width
- [number-slider]: sets the width (in pixels) of the border around each view’s text editor; technically, it’s the gap between the light and dark portions of the sunken border, so a width of 0 will still have the light and dark lines for the sunken edge
☐ No edge: will remove the entire border, including the light and dark bars, so it no longer appears sunken
- Vertical Edge Settings
- This will allow one or more vertical edges to be displayed while editing your file, to help with line lengths or positioning text. This edge indicator can either be a vertical line, or a background shading beyond the edge. The color of the line or background shading will be taken from Settings > Style Configurator > Global Styles > Edge Color: Foreground colour.
- Multiple Vertical Edges: There is one box, which accepts zero or more numbers:
- If the box is empty, there are no vertical edges.
- If there is one number ℕ in the box, there will be one vertical edge, after the column for the ℕth character.
- If there is more than one number (separated by whitespace), then there will be a vertical edge at each of the given character columns.
☐ Background mode: The vertical edge is usually a vertical line; if this option is checked, the vertical edge will be indicated by styling the background of the text to the right of the edge.
- Single Vertical Edge: In older versions of Notepad++, there was only a single vertical edge available, with more toggled options:
☐ Show vertical edge: Shows a vertical edge at the specified location, often used to indicate the right margin for manually setting the number of characters per line.☐ Line mode: The vertical edge is indicated by a solid vertical line.☐ Background mode: The vertical edge is indicated by styling the background of the text to the right of the edge.Number of columns: __: Sets where the vertical edge will be, in numbers of columns (characters) from the left edge of the page.
- Change History:
☐ Show in the margin: Shows a narrow column with a color to indicate lines that have been changed (orange), or lines that were changed in this session but have been saved (green), or changes that have been undone since the last change (light blue/green).☐ Show in the text: Shows a background color to indicate lines that have been changed, with the same rules as the margin version.- Colors: The background of this margin is set by the background color of the Global Styles > Change History Margin. The other colors are affected by the Change History modified, Change History revert modified, Change History revert origin, and Changed History saved styles.
- Line Number:
☐ Display: Shows the line numbers to the left of the text.☐ Dynamic width: The line number display will adjust its width based on the number of digits needed.☐ Constant width: The line number display will have enough width for any line number in the document.
- Padding: (new to v8.0.0)
- Left will add N pixels of padding between the left edge of the editor pane and the actual text (this is beyond the space allocated for the line numbering, and beyond the space allocated for the folding column). A bigger number leaves more of a gap, and thus less room for actual text.
- Right will add N pixels of padding between the right edge of the editor pane and the actual text. A bigger number leaves more of a gap, and thus less room for actual text.
- The Distraction Free setting changes the borders when Distraction Free Mode is active; a bigger number means more of the screen width is allocated to distraction free text, and a smaller number means less of the screen width is allocated to distraction free text.
☐ Display bookmark: Adds an additional margin to the left of the text editing area, to show a large shaded circle next to all lines that contain a bookmark, and green arrow symbols that bracket a range of hidden lines.
New Document
These define properties of new documents (end-of-line format, encoding, and syntax language).
- Format (Line ending):
Windows (CR LF)/Unix (LF)/Macintosh (CR): Newly-created files will use the normal Windows-style line ending, Unix/Linux/*nix-style line ending, or old Mac-style line ending. (Please note that modern MacOS X uses Unix-style line endings.)
- Encoding
ANSI: Characters are represented by a single 8-bit byte, and there are only 256 available code points.UTF-8: This can encode any of the Unicode characters; it uses a single 8-bit byte for codepoints under 128, and two or more bytes for other characters.☐ Apply to opened ANSI files: If you open an ANSI file, this allows it to be “upgraded” to UTF-8.
UTF-8 with BOM: This is the same as UTF-8 encoding, but saves the file with an extra Unicode character U+FEFF (which is encoded as 3 bytes in the file), which some applications use as an indication that it’s a UTF-8 file.UTF-16 Big Endian with BOM: This encodes characters (even those with codepoints under 128) with exactly two bytes. “Big Endian” refers to the order the two bytes will be written to disk (with most-significant byte first) (Prior to v8.0.0, it was shown asUCS-2).UTF-16 Little Endian with BOM: This encodes characters (even those with codepoints under 128) with exactly two bytes. “Little Endian” refers to the order the two bytes will be written to disk (with least-significant byte first) (Prior to v8.0.0, it was shown asUCS-2).- The final drop-down allows picking one of the old-style character sets (similar to using the main Notepad++ menu to select Encoding > character sets …).
- Note: The MISC > Autodetect character encoding option will also affect Encoding of existing files.
- Default Language: This pulldown sets whether new files will apply the styling for Normal Text, or use one of the programming-language syntax highlighting rules. User Defined Languages cannot be selected as the Default Language. The Default Language will be applied when a new file is created, and also when an existing file is opened whose type cannot be determined through the file extension or other means.
☐ Always open a new document in addition at startup: With this checkmarked, Notepad++ will always open a new blank document when you start Notepad++, in addition to any active session or files from the command-line (new to v8.5.4).☐ Use the first line of document as untitled tab name: With this checkmarked, instead of usingnew 1or similar, Notepad++ will derive the name of the tab from the first line of text in that tab (new to v8.8.2).
Default Directory
These affect open and save operations.
- Default Directory:
Follow current document: Open/save dialogs will default to the current directory for the current file.Remember last used directory: Open/save dialogs will remember the last directory you used in the dialog on subsequent uses of the dialogs (regardless of where the current file is located). Note: The last used directory will only be updated when the Open or Save option is selected; if you Cancel or escape out of dialog, the last used directory will not be updated and will keep its previous value.- In older versions, the last used directory is not remembered across runs of Notepad++: If you restart Notepad++, when you first initiate a Save As, it will prompt with the directory the
notepad++.exefile is in. But starting in v8.5.5, the active session file actually tracks that directory.
- In older versions, the last used directory is not remembered across runs of Notepad++: If you restart Notepad++, when you first initiate a Save As, it will prompt with the directory the
___ ...: this entry box with no label allows you to browse to a default directory, and all open/save dialogs will start in that directory
☐ Open all files of folder instead of launching Folder as Workspace on folder dropping: When checked, if you drag a folder from a Windows Explorer window, Notepad++ will open all the files individually; when unchecked, Notepad++ will use the Folder as Workspace feature when you drag the folder into Notepad++.
Recent Files History
These change how the list of recent files is displayed in the File menu.
☐ Don't check at launch time: Will skip checking whether files in the Recent Files History list exist at “launch time” (when you launch the application: that is, when Notepad++ is executed and is starting up).- This is useful if you have files on a network drive which intermittently aren’t visible, but you want to make sure files to remain in the Recent Files History list.
- This is also useful if you like knowing what files were previously edited, even after you’ve deleted those files from the folder.
Max number of entries: Show the n most recent files in the list.☐ In Submenu: Will show the recent files in a “Recent Files” submenu of the File menu, rather than directly in the File menu.☐ Only File Name: Will show just the file name, without the drive or path.☐ Full File Name Path: Will show the full path, including drive, path, and file name.☐ Customize Maximum Length: Will only list the first n characters from the full file path.
Note: Please understand that the Recent Files History shows the history of files recently closed, not recently opened.
File Association
This allows associating certain file types to be always opened (by Windows double-click, and similar) by Notepad++.
Select the name of the filetype in the left column; select one of the extensions in the middle column; use the right arrow → to add the extension to the Registered Extensions list on the right. (You can only do one extension at a time.)
To unregister an extension, click it in the right column, and use the left arrow ← to remove it from the Registered Extensions column.
Note: For this section to work, please run Notepad++ in Administrator mode, since it is modifying the registry.
Language
This affects the display of the main Language menu, and other language-specific settings. (However, the per-language indentation (“tab” vs “space”) settings have moved to the new Indentation section as of v8.7.)
- Language Menu:
☐ Make language menu compactwill make submenus for languages that start with the same letter.- Under normal circumstances, this makes the list of items in the Language menu much shorter: the standard 80+ languages will be reduced to about 20 submenus and a few standalone Language menu entries.
- For example, Perl and Python syntax highlighting would be selected through the Language > P submenu, rather than directly from the language menu.
Available items ⇄ Disabled items: by moving a language into theDisabled itemscolumn, it will no longer show up in the Language menu list.- If you have moved items to Disabled Items and have checked
☑ Make language menu compact, there may end up being empty letter-based subfolders in the Language Menu.
- If you have moved items to Disabled Items and have checked
☐ Treat backslash as escape character for SQL: This affects the Language > SQL handling of the\backslash character.
Indentation
These settings were all a part of the Language settings before v8.7.
- Indent settings:
- Previously called the “Tab settings” (before v8.6.9).
- Language selector panel:
[Default]sets the tab behavior for the “default” condition.normalsets the tab behavior for plain text.- Other selections will choose for which syntax-language the tab settings are being changed.
☐ Use default value: Not visible on the[Default]selection. For other languages, will use the values from the[Default]selection for that particular language.Indent size : ___: sets the width of the tab stop. (For example, the picture below shows a tab size of 4, so the tab stops will be at 1, 5, 9. and so on.)- Indent Using: When set to
Space character(s), hitting the Tab key will insert up to that number of space (U+0020) characters, such that the next character will be at the next tab stop; when set toTab character, the Tab key will insert the literal ASCII Tab (U+0009) character.-
This setting affects only what is typed after the setting is changed; turning this option on does not automatically change Tab characters that are already in your document. To convert already-existing Tab characters, you may use a search-and-replace or use the built-in Edit > Blank Operations commands.
-
Example: When set to
Tab character, hitting the Tab key will insert the single Tab character in the file which will be displayed as a gap wide enough to align the text to the next tab stop, as shown on the left of the image. WhenSpace character(s)is set, hitting the Tab key it will insert enough literal space characters so that the next character (after the spaces) will be aligned at the next tab stop, as shown in the right of the image.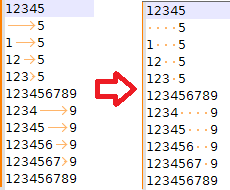
The image has View > Show Symbol > Show Space and Tab enabled to make the tab-characters vs space characters obvious.
-
This option was previously called
☐ Replace by space” (renamed in v8.6.9)
-
☐ Backspace key unindents instead of removing single space: If this is checkmarked, typing Backspace key when the caret is in the spaces at the beginning of a line will cause the text of the line to shift to the next-earlier tab stop (deleting 1..ℕ spaces, where ℕ is the tab stop size; the number of spaces deleted will be sufficient to move it to the tab stop) – this makes this Backspace behave similarly to using Shift+Tab to unindent. If the option is not checkmarked, typing Backspace key when the caret is in the spaces at the beginning of a line will just delete a single space character. (New to v8.6.9.)
- Auto-indent:
☐ None: If you hit Enter on a line that’s indented, the next line will not be indented.☐ Basic: If you hit Enter on a line that’s indented, the next line will be indented the same amount as the current line.☐ Advanced: If you hit Enter on a line that’s indented, the next line will usually be indented the same amount as the current line; but for programming languages that allow hierarchical blocks (like afor(){...}loop in C/C++), it can automatically add the extra indentation when you start a new block, and end the extra indentation when you close the block.- This option was previously the
☐ Auto-indentcheckbox in the Auto-Completion preferences (before v8.7), and would just allow choosing between automatically indenting or not, always using the “advanced” algorithm (so in older versions, you cannot force Basic-style auto-indentation). - Note: For either Basic or Advanced mode, if you hit Enter while the caret is in the middle of an indented line, immediately before one or more space or tab characters (like between the
oand the space intwo words), the space(s) will get converted into the indentation character(s) for the new line (so in the example,wordswill be indented, but without the extra space). It will, however, leave the caret at the start of the line, rather than immediately before the first non-space character on the line. If you have some words, then a space, then the end-of-line, hitting Enter just before that space will create a new, indented line with the proper indentation, but the caret will be at the beginning of the line, and not indented (so if you don’t have View > Show Symbol > Show Space and Tab, you might incorrectly think that auto-indent didn’t work on that line).
Highlighting
Affects the highlighting of the selected text, which is referred to by the menu entries as the “Token”.
- Style All Occurrences of Token (previously Mark All)
- Note: This section of the preferences was renamed with v8.1.4; it was known as Mark All in v8.0 - v8.1.3.
☐ Match case: Mark All will be case-sensitive.☐ Match whole word only: Mark All will require a whole “word” (sequence of “word characters”, as defined in the Delimiter preferences).- This setting section applies to the Search menu’s Mark All submenu entries, and the equivalent right-click Context Menu‘s Style all occurrences of token submenu entries, for applying “Style Tokens” to specific text.
- Smart Highlighting
☐ Enable: If you select a piece of text, Smart Highlighting will color all matching pieces of text. It will use the style defined in Style Configurator > Global Styles > Smart Highlighting.☐ Highlight another view: Smart Highlighting will also apply to the other “view” (when you have documents open in both of Notepad++ view panes).Matching: ☐ Match case: Smart Highlighting will be case-sensitive.Matching: ☐ Match whole word only: Smart Highlighting will require a whole “word” (sequence of “word characters”, as defined in the Delimiter preferences).Matching: ☐ Use Find dialog settings
- Highlight Matching Tags
☐ Enable: In HTML/XML files, clicking in or highlighting in an opening or closing tag (between the angle brackets) will highlight both the opening and closing tag. It will use the style defined in Style Configurator > Global Styles > Tags match highlighting.☐ Highlight tag attributes: Any attributes inside the active tag will be highlighted using the style defined in Style Configurator > Global Styles > Tags attribute.☐ Highlight comment/php/asp zone
Note: If you select a whole word and have the ☐ Match whole word only option checkmarked, the Smart Highlighting or Style All Occurrences will match that in other locations only if there is a “word boundary” before and after a potential match (space, punctuation, start/end of line, and similar). If you select multiple whole words (like whole words) with this option, then Smart Highlighting will not match anything, but Style All Occurrences will match in locations where there is a word boundary before the first word (before whole) and a word boundary after the final word (words; so in text like another whole word here or parenthetical (whole word) also, the whole word will be styled). If you have a selection that includes punctuation at the beginning and/or the end of the selection, you are violating the understanding of “whole word” in the selection, because you are not limiting your selection to something that can reasonably be determined to be a “word”; thus, the Smart Highlighting and Style All Occurrences behavior will likely be confusing in that situation (and might not even behave identically to each other). If you are selecting mixed punctuation and characters and spaces, these features are more likely to meet your expectations if you do not have ☐ Match whole word only checkmarked. In general, if what you are selecting is not just a single “word” (group of alphanumeric text), it is recommended to not have that option checkmarked.
Affects how the text is formatted when sent to the printer.
☐ Print line number: Will include line numbers when printed.- Color Options
☐ WYSIWYG: What you see is what you get. The same colors you see in the editor will apply to printing.☐ Invert: Black prints as white, light color prints as dark, and vice versa.☐ Black on White: Prints black text on white background, no highlighting.☐ No background color: Same as WYSIWYG, except no background color is printed.
- Margin Setting (Unit:mm): Define the page margins, in mm.
- Header and Footer: Define what will be printed in each page’s header and footer sections.
- Click in one of the
Left part,Middle part, orRight partfor header or footer; - Either type in text for literal text, or use the
Variable:drop-down andAddbutton to add one of the variables at the current caret position:- Add Full file name path ⇒
$(FULL_CURRENT_PATH)in the input box ⇒ will print something likeC:\path\to\file.txt - Add File name ⇒
$(FILE_NAME)in the input box ⇒ will print something likefile.txt - Add File directory ⇒
$(CURRENT_DIRECTORY)in the input box ⇒ will print something likeC:\path\to - Add Page ⇒
$(CURRENT_PRINTING_PAGE)in the input box ⇒ will print the current page number. (Sorry, there is no total-number-of-pages variable, so you cannot dopage # of #.) - Add Short date format ⇒
$(SHORT_DATE)in the input box ⇒ will print something likem/dd/yyyy(possibly locale-dependent) - Add Long date format ⇒
$(LONG_DATE)in the input box ⇒ will print something likeDay, Month ##, YYYY(possibly locale-dependent) - Add Time ⇒
$(TIME)in the input box ⇒ will print something likeHH:MM AM(possibly locale-dependent)
- Add Full file name path ⇒
- Font pulldown: Use selected font for the header or footer (if left blank, use document’s default font).
- Font size pulldown: Define font size for header or footer.
- Click in one of the
Searching
Affects the operations found in the Find dialog tabs.
-
When Find Dialog is Invoked
Minimum Size for Auto-Checking 'In selection': _____: Integer value used for deciding whether to automatically checkmark ☐ In Selection. (new to v8.5.8)- When a search function is initiated while a stream selection is active in the editor, the ☐ In Selection option will become automatically checkmarked if this setting is not
0and the number of characters in the selection is above the specified value. Additionally, if this setting is non-zero, the ☐ In selection option will be automatically cleared when a search is initiated with no stream selection active in the editor. When the setting is0, the user will entirely control the state of the ☐ In selection checkbox (that is, the program won’t change the check state at all). - The default value is
1024characters. - Allowed values:
0characters is the smallest integer value allowed.1024is the largest integer value allowed. If you enter an integer value greater than1024then the field value will change to1024immediately. If you attempt to enter a non-digit character (like a decimal point or a letter), the field will pop up an error message indicating that only digits are allowed to be entered.
- When a search function is initiated while a stream selection is active in the editor, the ☐ In Selection option will become automatically checkmarked if this setting is not
☐ Fill Find Field with Selected Text: When checkmarked, invoking the Find Dialog will fill the Find What field with the currently-selected text; when not checkmarked, invoking the Find Dialog will not change the contents of the Find What field (reworded in v8.4.5; previously wasDon't fill find field...)☐ Select Word Under [caret](#caret-and-cursor "typing/insertion cursor") when Nothing Selected: When checkmarked, invoking the Find Dialog with no active selection will fill the Find What field with the text under the caret; when not checkmarked, invoking the Find Dialog with no active selection will not change the contents of the Find What field; if the option above is not checkmarked, this option will be un-checkmarked and cannot be toggled. (new to v8.4.5)
- Note: The fill will only occur if the size of the active selection is 1024 characters or less. This is a fixed value and is unrelated to the
Minimum Size for Auto-Checking 'In selection'value.
☐ Fill Find in Files Directory Field Based On Active Document: If this is checked, Notepad++ will initialize the Directory to the current document’s directory when you first launch Find in Files dialog. (Note that “first launch” means that if you change the active tab while the dialog is still open, the Directory field will not change.) If you manually change the directory (either through typing, or using the...button), it will search the newly-entered directory, rather than using the directory it defaulted to. The next time you launch the dialog, it will update the default directory again (assuming the option is still checked). And there is a « button in the dialog which will re-populate the Directory field based on the active dialog, no matter the state of this option, and whether or not the active document has changed since the dialog was launched. (This preference is new to v8.7.5, and replaces the ☐ Follow current doc checkbox, which used to be present in the dialog in v8.7.4 and earlier.)
-
☐ Use Monospaced font in Find dialog (Need to restart Notepad++): Changes the font from standard proportional font to a monospaced font in the text boxes in the Find dialog; requires restarting Notepad++ to change. -
☐ Find dialog remains open after search that outputs to results window: Successful file-level searches cause the Find window to close; selecting this option keeps the window open always. -
☐ Confirm Replace All in All Opened Documents: When checked, Replace All in All Opened Documents will ask for confirmation. -
☐ Replace: Don't move to the following occurrence: When checked and a match is selected, Replace will make the indicated substitution, but then will NOT automatically move the caret to the subsequent match (added v8.0.0). -
☐ Search Result window: show only one entry per found line: When checked, the Search Results Window will only list each line once, even if the line has multiple matches; when unchecked, it will behave like older versions and list each line once for each match on that line (added v8.4.3).
Backup
Defines whether or not to perform saving sessions, periodic backup, and backup on save.
- Session snapshot and periodic backup
☐ Remember current session for next launch: The current session is the current list of open files. The next time you run Notepad++, it will open with that same list of files.☐ Enable session snapshot and periodic backup: This will auto-save your changed file once every N seconds to the listed directory (default to%AppData%\Notepad++\backup\) – auto-saving will not happen for a given file if that file has not been changed during that interval.- It is not possible to select this option without
☐ Remember current session ...also being active. - This is also how you enable Notepad++ to remember unsaved changes.
- This will allow you to exit Notepad++ and resume, remembering changes to files that hadn’t been intentionally saved.
- When you exit Notepad++ with unsaved changes, Notepad++ will not ask you to save changes. It will just keep the periodic backup file, and reload from there rather than from the normal disk location for the file.
- If you want Notepad++ to ask you to save edited files every time you close the file or exit Notepad++, do not enable this option.
- This is not a long-term backup option.
- Every time you do a manual save, or every time you close the file while leaving Notepad++ open, this periodic backup of the file will be deleted.
- If there is a Notepad++ crash or Windows crash, it is possible for you to lose data.
- Periodic Backup file naming:
- For named files (existing or saved files that have recent edits) the name of the backup file (in the listed directory) is
filename.ext@yyyy-mm-dd_hhmmss, wherefilename.extis from the main file. As soon as you manually save the file (so it’s written to disk in the real location), the backup goes away, because the purpose of the periodic backup is to save a copy of a file that you’ve edited but not saved. The timestamp part of the periodic-backup-name is based on the first automatic save after the last manual save. Example: if you saved a file at 8:10:00am, the backup would go away; then, at 8:12:30am, you type something but don’t save, so sometime within N seconds of that (8:12:30+N) it will periodic-backup-save and make a file with a timestamp about then – something likefilename.ext@2021-06-23_081234. If you left for a while (or exited Notepad++ and reloaded) and came back at 12:34:56pm and typed another character, it would do it’s periodic-backup-save on that file again so the last-modified time of the backup would be updated), but the name of the periodic-backup file will remain the same. - For unnamed files (new files that haven’t been saved) the name of the backup file (in the listed directory) is
new NNN@yyyy-mm-dd_hhmmss, wherenew NNNmatches the name listed in the tab title. Sincenew NNNfiles are by definition not manually saved, the timestamp in the periodic-backup filename is based on when it did the first periodic-backup-save for that unnamed file.
- For named files (existing or saved files that have recent edits) the name of the backup file (in the listed directory) is
- WARNING: The Notepad++ periodic backup feature in multi-instance setups will work only for the first Notepad++ instance; there will be no periodic backup for subsequent instances.
- It is not possible to select this option without
☐ Remember inaccessible files from past session: Changes the behavior of how Notepad++ handles files that don’t seem to exist when Notepad++ loads the session. With the option checkmarked, sessions can remember files even if they don’t exist any more, based on your reply to a dialog box; if it is not checkmarked, sessions will not remember missing files. There is more about this behavior documented in Sessions > Inaccessible Files. (New to v8.6.)
- Backup on save
☐ None: No additional backup will be performed when the file is saved.☐ Simple backup: It will save a copy of the file, with the same name and extension, but with.bakappended.- If the
Custom Backup Directoryis turned on and defined, it will save the simple backup in that defined directory; for example, if it is set asC:\myCustomBackupFolder\, then the fileC:\path\to\file.txtwill save its simple backup asC:\myCustomBackupFolder\file.txt.bak- Note: If you are editing two files with the same name which are in separate directories (like
C:\path\a.txtandC:\other\a.txt), the Custom Backup directory will only contain one backup file (a.txt.bak), with the contents of whichever file was saved most recently. Turning offCustom Backup Directorywill eliminate this problem, because then the backup of a file will reside in the same directory as the original, so there will not be name conflicts on the backups.
- Note: If you are editing two files with the same name which are in separate directories (like
- If the
Custom Backup Directoryis not turned on and defined, it will save the simple backup in the same directory as the original file; for example, savingC:\path\to\file.txtwill save its simple backup asC:\path\to\file.txt.bak.
- If the
☐ Verbose backup: It will save a copy of the file, with a date-and-timestamp added to the filename (in the formatyyyy-mm-dd_hhmmss) as well as the.bakextension.- If the
Custom Backup Directoryis turned on and defined, it will save it in that directory; for example, if it is set asC:\myCustomBackupFolder\, then the fileC:\path\to\file.txt filewould be backed up asC:\myCustomBackupFolder\file.txt.2021-06-28_073650.bak- Note: If you are editing multiple files with the same name which are in separate directories (like
C:\path\a.txtandC:\other\a.txt), the Custom Backup directory will contain verbose backup files for nearly all individual saves; however, if it happens that both files were saved within the same second (by being really fast, or using Save All), then only one backup file will exist with that timestamp (a.txt.2021-06-28-073722.bak), with the contents of whichever file happened to be saved last in that second. Turning offCustom Backup Directorywill eliminate this problem, because then the backups of a file will reside in the same directory as the original, so there will not be name conflicts on the backups.
- Note: If you are editing multiple files with the same name which are in separate directories (like
- If the
Custom Backup Directoryis not turned on and defined, it will save it in the.\nppBackup\subdirectory of the file’s current directory; for example, savingC:\path\to\file.txtwill create a backup calledC:\path\to\nppBackup\file.txt.2021-06-28_073650.bak
- If the
☐ Custom Backup Directory: Leave blank to put the backup in the same directory as the file; set to a directory to have all files backed up to one directory.
Important backup information
This bears repeating: with ☐ Enable session snapshot and periodic backup on, Notepad++ will allow you to exit with unsaved changes without asking you to save, and unless an error occurs, the next time you run Notepad++, your unsaved changes will still be there. Notepad++ has been coded in such a way as to make this periodic backup as reliable as possible. However, there are crashes and errors possible outside of Notepad++'s control, and there is no guarantee or warranty that your unsaved data will remain after a crash or other major system error. Once you manually save, the periodic backup is deleted. The builtin periodic backup should not be considered a long-term backup option, and unsaved changes in files should always be considered as volatile and unsaved.
Backup on save is the long-term backup solution built into Notepad++: Simple backup will just keep one copy that matches the most recent save of the file; verbose backup keeps multiple copies with date stamps. The location of backup-on-save backup files is described above.
If you are editing mission-critical files: Your data is your responsibility. It is recommended to always use dedicated backup software in addition to any periodic-backup or backup-on-save features you have enabled. You may want to look into the AutoSave plugin (available through Plugins > Plugins Admin) for better control of automated-saving while changes are being made – though if you install that plugin, understand that you have to configure it before it will automatically save your file(s) for you. Using cloud-based folders may provide backup and/or revision history. A dedicated revision control system, such as Git or Subversion, will provide control over your version history.
Auto-Completion
Sets options for auto-completion of text, including word completion, syntax completion, and automatically pairing certain punctuation pairs and html/xml tags.
- Auto-Completion
☐ Enable auto-completion on each input: A dropdown selection will appear as you type; arrow keys will select various choices, TAB or ENTER will accept a choice, ESC will cancel auto-completion.☐ Function completion: Will auto-complete function names only, based on the keywords in the active auto-completion file.☐ Word completion: Will auto-complete words only, based on words that already exist in the current file.☐ Function and word completion: Will auto-complete both function names and words.
From _n_th character: Must type at least n characters before auto-completion activates.- If
☐ Enable auto-completion on each inputis unchecked, the _n_th character entry will be disabled (greyed out).
- If
☐ Ignore numbers: Won’t try to auto-complete when typing numbers.- Insert Selection: v8.2.1 added a new section.
☐ TAB: Toggles whether TAB will accept your choice.☐ ENTER: Toggles whether ENTER will accept your choice.- v8.2 and earlier behaved as if both have checkmarks; v8.2.1 and later defaults to having TAB checkmarked but ENTER not checkmarked, so the default behavior has changed.
☐ Make auto-completion list brief: when unchecked, once the auto-completion list pops up, the list will stay the same size even as you type additional letters, but the selection will move to the first word that matches all the characters typed; when checked, as you type more characters, the auto-completion list will shrink to only match words that match all the typed characters (new to v8.5; prior to v8.5, the list never shrank).- Example: If you have
abc,acb, andaddin your auto-completion list and start auto-completion from the 1st character, when you typea, all three words will appear in the auto-completion list. With this option unchecked (or in earlier versions of Notepad++), typingdnext will just move the selection toadd, but all three words will still be shown; with this option checked, once you type thed, onlyaddwill be shown in the list.
- Example: If you have
☐ Function parameters hint on input: For applicable programming languages, will provide hints on what to type in a function parameter list.- Please note that if you use Edit > Auto-Completion > … menu entries to activate the completion features, you can force function or word or parameter completion, even when those checkboxes are turned off in the settings, and even if there aren’t enough characters typed to trigger the auto-completion.
- Auto-Insert
- Will automatically insert the closing item for any of the checked pairs, or the three manually-chosen matched pairs.
☐ ()☐ []☐ {}☐ ""☐ ''☐ html/xml close tagMatched pair [1,2,3]: __ __: Define the open and close character(s) for three user-defined pairs.
- Will automatically insert the closing item for any of the checked pairs, or the three manually-chosen matched pairs.
(If you are looking for the ☐ Auto-indent option that used to be in this section of preferences, that has been moved to the Indentation section of the preferences, starting in v8.7.)
Multi-Instance and Date
The Multi-Instance settings determine whether multiple instances of Notepad++ can be run simultaneously.
WARNING: The Notepad++ periodic backup feature in multi-instance modes will work only for the first Notepad++ instance; there will be no periodic backup for subsequent instances.
The Multi-Instance settings include:
☐ Default (mono-instance): Every time you open a file from Windows, it will go into the single Notepad++ instance. If you open a session file while Notepad++ is already open, the files from that session will be opened in addition to the files you already have open.☐ Always in multi-instance mode: Every time you open a file from Windows, it will open a new instance of Notepad++.☐ Open session in a new instance (and save session automatically on exit): Each session will open in a new instance, but multiple files can be opened in each session. “Opening a session” can be done either by using File > Load session…, or (if you have set the MISC > Session File ext) by opening a file with that extension. From Notepad++ v8.2, the loaded session in the new instance will be saved automatically while exiting the instance, if this option is set.
WARNING: If you select anything other than Default (mono-instance), changed settings in one instance will not influence the settings in the other instance, and only the changed settings in the last instance closed will be saved to disk.
The Panel State and [-nosession] checkboxes allow panel state to be remembered even when running in multi-instance mode or with -nosession (added v8.4.9). Normally, when run with -nosession, or when subsequent instances are run, all panels start as “off” (because the new instance ignores the session file). With each panel type that is checkmarked in these settings, Notepad++ will “remember” whether that panel was open in the previous session, even when the session is otherwise being ignored. The panels available are Clipboard History, Document List, Character Panel, Folder as Workspace, Project Panels, Document Map, Function List, and a catchall for all Plugin panels. For changes to these settings to take effect, Notepad++ must be restarted.
The Customize insert Date Time settings will allow you to customize the time format inserted by Edit > Insert > Date Time (customized).
☐ Reverse default date time order (short & long formats): If checked, the short and long formats will insert the date then the time; if unchecked, the short and long formats will insert the time then the date.Custom Format: Enter in the format string that will define the date and time display desired when inserting the customized time.
| Format | Description | Example |
|---|---|---|
| — | Day | — |
| d | Day of the month as digits without leading zeros for single-digit days | 1, 31 |
| dd | Day of the month as digits with leading zeros for single-digit days | 01, 31 |
| ddd | Abbreviated day of the week | Mon |
| dddd | Day of the week | Monday |
| — | Month | — |
| M | Month as digits without leading zeros for single-digit months | 1 |
| MM | Month as digits with leading zeros for single-digit months | 01 |
| MMM | Abbreviated month | Nov |
| MMMM | Full month | November |
| — | Year | — |
| y | Year represented only by the last digit | 9 |
| yy | Year represented only by the last two digits - A leading zero is added for single-digit years. | 99 |
| yyyy | Year represented by a full four or five digits | 1999 |
| g, gg | Period/era string formatted | B.C., A.D. |
| — | Time | — |
| h | Hours with no leading zero for single-digit hours; 12-hour clock | 1, 11 |
| hh | Hours with leading zero for single-digit hours; 12-hour clock | 01, 11 |
| H | Hours with no leading zero for single-digit hours; 24-hour clock | 1, 23 |
| HH | Hours with leading zero for single-digit hours; 24-hour clock | 01, 23 |
| m | Minutes with no leading zero for single-digit minutes | 9, 59 |
| mm | Minutes with leading zero for single-digit minutes | 09, 59 |
| s | Seconds with no leading zero for single-digit seconds | 9, 59 |
| ss | Seconds with leading zero for single-digit seconds | 09, 59 |
| t | One character time marker string | A, P |
| tt | Multi-character time marker string | AM, PM |
Delimiter
Sets the characters that are considered part of a “word” for quick selections using double-click, Smart Highlighting, or the “match whole word only” in a normal search expression. It is also used for auto-completion. This setting does not affect a regular expression‘s interpretation of a word character or word boundary.
- Word character list
☐ Use default Word character list as it is: For Smart Highlighting (see above) or the Normal search mode in the Find and Replace dialogs, will use the normal alphanumeric rules for determining what constitutes a word for “Match Whole Word Only”.- The default “word characters” include anything that Unicode considers alphanumeric, plus the underscore “_” character.
- Includes: Standard Latin characters, accented characters, letter-like symbols, superscript digits, and enclosed (circled) digits
- Excludes: Punctuation, mathematical operators, box drawing, arrows, emoji, or other such symbols
- The default “word characters” include anything that Unicode considers alphanumeric, plus the underscore “_” character.
☐ Add your character as part of word: Sometimes, the default “word character list” may not be sufficient to you; if you want other characters to be considered in “whole word only”, add them here.- The value should be a string consisting of all the additional characters you would like to be included as a “word character”.
- Spaces are liable to cause problems, and are not recommended to be present in this entry. If you try to add a space, the dialog box will show a warning message.
- If you have characters in this box, then later come and delete them all out, it will not fully stop using those extra characters as delimiters until you switch the preference back to using the default word character list, or restart Notepad++.
- Delimiter selection settings
- If you define open and close characters, Ctrl + MouseDoubleClick will select everything inside that delimiter pair
☐ Allow on several lines: Ctrl + MouseDoubleClick will work across multiple lines, instead of just on a single line
Performance
Some features may slow performance in large files. These features can be auto-disabled on opening a large file, using the settings in this section. (This customization section is new to v8.4.7. In previous versions, Notepad++ just quietly deactivated syntax highlighting on any files greater than 200MB, without user configurability.)
NOTE:
- Modifying options here requires you to re-open currently opened large files to get proper behavior.
- If “Deactivate Word Wrap globally” is checked and you open a large file, “Word Wrap” will be disabled for all files. You can re-enable it via View > Word Wrap.
- Large File Restriction
?: This box provides some helpful hover text (the introductory paragraphs in this manual section were derived from this hover text).☐ Enable Large File Restriction (no syntax highlighting): When checked, there will be no syntax highlighting for large files, and the other options below will come into effect; when unchecked, there will be no Large File Restrictions active, and Notepad++ will apply all syntax highlighting and other features, even on large files, despite any performance losses.Define Large File Size: ___ MB: Put in “size limit” which will trigger Large File Restrictions.☐ Deactivate Word Wrap globally: When checked, Notepad++ will deactivate the Word Wrap feature for all files (whether large or small) when a large file is opened; when unchecked, Word Wrap features will not be affected when a large file is opened.- When this option is checked, opening a file that is bigger than the threshold will turn Word Wrap off for the entire application, affecting the tabs for all open files, not just the large file’s tab. Closing large files will not turn Word Wrap back on; exiting and restarting Notepad++ will not turn Word Wrap back on either, as the Word Wrap state is saved when Notepad++ exits. Once the Large File Restrictions have triggered Word Wrap off, Word Wrap must be manually re-enabled using the Word Wrap button on the toolbar or the View > Word Wrap menu command.
☐ Allow Auto-completion: When checked, Auto-completion will still be available for large files. When unchecked, large files will not allow Auto-completion.☐ Allow Smart Highlighting: When checked, Smart Highlighting will still be available for large files. When unchecked, large files will not allow Smart Highlighting.☐ Allow Brace Match: When checked, the Brace Match feature will still be available for large files. When unchecked, large files will not allow Brace Match.☐ Allow URL Clickable Link: When checked, text that looks like a URL will be presented as a clickable link. When unchecked, large files will not turn URL text into clickable links.
Cloud & Link
-
Settings on cloud: Allows saving your settings to the cloud instead of in the normal
%AppData%or program-install folders. More information can be found in the Config files location.☐ No Cloud: Saves settings in the normal location.☐ Set your cloud location path here: Settings will go in the given directory, which is assumed to be in a folder that’s synced to your cloud-provider.
-
Clickable Link Settings: Affects behavior of URLs in your document.
☐ Enable: Text that appears to be a URL will allow you to double-click to open that URL in your default browser. When you hover over the URL, it will change to the style defined in Style Configurator > Global Styles > URL hovered.☐ No underline: Will remove the underline normally present on a link.☐ Enable fullbox mode: The background color and foreground color will change on hover-over; when unchecked, just the foreground color will change.URI Customized Schemes: Space-separated list of additional schemes to recognize as URLs. The schemesftp:// http:// https:// mailto: file://are always recognized, no matter what the contents of this setting, so they need not be included in this entry box.
Search Engine
Set your search engine for “Search on Internet” command (found in the Edit > On Selection menu, or in the right-click context menu). It will search for the word under the caret (or for the whole selection, if a selection is made).
If you want to specify a search engine not listed, type the full URL, with the text $(CURRENT_WORD) as the placeholder for the search term (as shown in the example in the Preferences dialog box).
MISC.
A variety of settings that didn’t fit elsewhere
- Document Switcher
☐ Enable: When checkmarked, using Ctrl+Tab will allow you to use the Document Switcher popup to switch through all the open documents.☐ Enable MRU behavior: It will default to selecting the most recently used file (or “MRU”, for short) in the Ctrl+Tab list.- When checkmarked: Ctrl+Tab will take you to the most recently used document. Also, if you close the active tab, it will activate the most recently used tab.
- When not checkmarked: Ctrl+Tab will take you to the next tab in the Document Switcher menu (the tab to the right). Also, if you close the active tab, it will activate the next tab in the Document Switcher menu (the tab to the right) or the last tab in the Document Switcher menu if the closed tab used to be the last tab.
- Document Peeker
☐ Peek on tab: If you hover over an inactive tab, it will give you a tiny “peek” at the document (a ultra-tiny font preview, similar to the document map), in a small popup near the tab bar.☐ Peek on document map: If you hover over an inactive tab, it will change the Document Map (View > Document Map) pane to show the preview of that tab, rather than of the active document.
- File Status Auto-Detection
- [pulldown]
Enable: For the active file only, will check periodically to see if the file has been updated on disk, and will prompt to ask if you want to reload the file from the disk, or keep the version that’s currently in Notepad++.Enable for all open files: For all active files, check periodically to see if the file has been updated on disk.Disable: Will not check to see if the file has been updated on disk.
☐ Update silently: Instead of prompting, will automatically reload the file from disk.☐ Scroll to the last line after update: Will scroll to the end of the file after reloading from disk (otherwise, the caret and scrolled-location stays where it was before the update).
- [pulldown]
- System Tray dropdown
No action tosystem tray: Neither minimizing Notepad++ nor closing Notepad++ will place the Notepad++ icon on the system tray.Minimize tosystem tray: Place the Notepad++ icon on the system tray (instead of the task bar) when the Notepad++ window is minimized.Close tosystem tray: Place the Notepad++ icon on the system tray (instead of the task bar) when the Notepad++ application is closed. (New to v8.7.1.)Minimize / Close tosystem tray: Place the Notepad++ icon on the system tray (instead of the task bar) when the Notepad++ application is minimized or closed. (New to v8.7.2.)- The dropdown is new to v8.7.1. In previous versions, there was just a checkbox for
☐ Minimize to system tray, and there was noClose tooption available. - For more details on the System Tray behavior, see User Interface > System Tray.
- Direct Write rendering mode dropdown
- DirectWrite will help in displaying characters even if the active font doesn’t have a glyph.
- There are five options (third and fourth added v8.7.8, fifth in v8.7.9):
GDI (most compatible): This version is “most compatible”, but it’s because it doesn’t have any of the features available in the other DirectWrite choices.DirectWrite (default): This is the “normal” DirectWrite mode. This is the default for a new installation of Notepad++.DirectWrite (retain frames): Use this if it works best for you, or if you’ve been asked to try “DirectWrite (retain frames)” (new to v8.7.8).DirectWrite (draw to GDI DC): Use this if it works best for you, or if you’ve been asked to try “DirectWrite (draw to GDI DC)” (new to v8.7.8).DirectWrite (DirectX 11): Use this if it works best for you, or if you’ve been asked to try “DirectWrite (DirectX 11)” (new to v8.7.9).- If you have having trouble rendering certain glyphs for Unicode characters (like various Asian characters or emoji), or having trouble with other rendering issues, you may want to try each of the four settings, to see which works best for you.
- Note: DirectWrite settings also affect whether a font can make use of its “ligature” features.
- Some fonts, like Fira Code and Cascadia Code, have the ability to display the two character sequence
!=(“not equal to” in many coding languages) as something that looks similar to the single character≠… but it’s still really two characters (and you can even put the typing caret between the two characters, so it looks like it’s “inside” the symbol); there are many other multi-character ligature equivalents in those coding fonts – look at the documentation or web-page for your specific font to find out what ligatures (coding and otherwise) that it supports. - If you don’t like the coding ligatures, you can either change to
GDI (most compatible), or you can change your default font to a font that doesn’t have ligatures, like Fira Mono or Cascadia Mono (the non-code-ligature versions of the fonts mentioned above), or the Consolas font that Microsoft defaults for monospaced applications, or the Courier New that used to be the default monospaced font for Windows.
- Some fonts, like Fira Code and Cascadia Code, have the ability to display the two character sequence
- Before v8.7.8, this was a checkbox:
☐ Use DirectWrite (May improve rendering special characters, need to restart Notepad++): Enables DirectWrite drawing.- Unchecked is equivalent to the v8.7.8
GDI (most compatible); checked is equivalent to v8.7.8DirectWrite (default). - The modified rendering may affect the clarity or readability of the characters for some users or systems (for some users, it increases readability; for others, it decreases readability).
- Before v8.6, DirectWrite was off by default (this option was not checkmarked). Since v8.6, DirectWrite has been on by default (this option is checkmarked).
- Some users notice performance issues when this is checkmarked; those affected should choose
GDI (most compatible)(or uncheckmark the option in older versions). - Staring in v8.6.9, this option will be automatically disabled on Windows Server (which cannot use DirectWrite).
- Unchecked is equivalent to the v8.7.8
- Auto-updater dropdown (more optoins starting in v8.8.2):
Disable: Will not automatically check for updates. You can still use ? > Update Notepad++ or download a newer installer from the official downloads page.Enable on Notepad++ Startup: Will automatically check for updates. If one is available, it will ask if you would like to upgrade when Notepad++ first launches.Enable on Notepad++ Exit: Will automatically check for updates. If one is avaialable, it will ask if you would like to upgrade when Notepad++ is closed.- In v8.8.1 and earlier, this was just a checkbox:
☐ Enable Notepad++ auto-updater: Will automatically download updates from the official website, once the development team has decided it’s time to push an update to users. If unchecked, you will have to manually download the installer from the official website yourself. - See the section on upgrading Notepad++
☐ Mute all sounds: When unchecked, a sound will provide feedback on certain actions (example: a search action in Find / Replace dialog results in the text not being encountered); when checked, Notepad++ will remain silent for those actions.☐ Autodetect character encoding: When opening a new file, try to algorithmically determine what character encoding should be used. (Other Encoding settings can be found in the New Document tab of the Preferences Dialog.)☐ Show only filename in title bar: Use just the file name (instead of the full path) of the active file in the Notepad++ title bar.☐ Enable Save All confirm dialog: When the Save All command is issued, will pop up a dialog to confirm you really want to save all: Yes will Save All; No will not save all this time, but will ask again next time; Always yes will save all and will uncheck this preference so that Save All will stop asking for confirmation in the future.Session file ext.: Enter a file extension (without the.). When you open a file with this extension (whether from Windows file associations, or from the Notepad++ File > Open or similar), Notepad++ will treat the file as a session file, and open the files from that session, rather than showing and editing the contents of the file. This will honor the Multi-Instance settings.Workspace file ext.: Enter a file extension (without the.). When you open a file with this extension (whether from Windows file associations, or from the Notepad++ File > Open or similar), Notepad++ will treat the file as a workspace file, and open that workspace, rather than showing and editing the contents of the file. This will honor the Multi-Instance settings.
Style Configurator
The Style Configurator dialog has three regions: Select theme, language and style selection lists, and the style definition.
The “Select theme:” pulldown allows you to select which theme you want. Themes are pre-defined sets of formatting rules, which often try to use a consistent color scheme between languages.
The “Language:” pulldown (it was a selection list before v8.7.8) lets you select whether you want to set the formatting for “Global Styles”, or a specific programming language that you want to set the highlighting for. The “Style:” selection list lets you select which highlighting rule to edit for the given language.
On all but “Language: Global Styles”, there will also be a “Default ext.” box, which is an un-editable list of the default file extensions associated with that Language; and the “User ext.” box, where you can add a user-defined list of additional extensions (space separated, don’t use the . in the extension), which says which other extensions you want to apply this language’s formatting to. (Please note that any changes you make in the Style Configurator dialog box for a specific language only applies to that language and only applies to the selected theme: If you add a user-defined extension to a language in the Default (stylers.xml) theme, it will not affect the list of user-defined extensions for that language in any of the other themes.)
Note: There is no specific Language entry called “Normal text” or “Plain text” in the Style Configurator. To edit the colors for a plain text file (like .txt), use the “Global Styles” language and the “Default Style” entry in the “Style:” column.
The right half of the dialog is where you edit the colors and fonts for the selected Language and Style. The title-text for the right side will list which language and style are selected. The Colour Style allows you to choose the Foreground or Background color by clicking on the colored box. You can also make the style’s Foreground or Background color ignored, by right-clicking on the colored box (you’ll see the additional diagonal stripes on the colored box) - in this case the default background/foreground color will be used. The Font Style allows you to pick the font, size, and bold/italic/underline settings. If Font name or Font size are left blank, they will inherit from the Global Styles: Default Style. If you right-click a color, you will see diagonal stripes across the color, indicating it is set to “inherit”, meaning that it will take that color from the Default Style. Under the “Language: Global Styles” with “Style: Global override”, there are also a series of checkboxes for “Enable global xxx”, which will mean that Notepad++ will use the Global override setting for that attribute, rather than using the per-language styling settings for that attribute.
Some language/style combinations (like Perl > INSTRUCTION WORD) will additionally have a list of default keywords (not editable) and user-defined keywords (which allow you to add new keywords to apply this style to). The GUI is limited to allowing you to enter about 30,000 bytes in the user-defined keywords box; that’s enough for around 3,000 keywords in each user-defined keyword list, depending on the length of your keywords, which should be sufficient for most users. If that is not sufficient for you, you can actually edit the stylers.xml or other theme config file manually, where you can enter more characters (following the advice for editing config files, of course), then save the file and restart Notepad++; once you enter more than 30,000 bytes and restart, the Style Configurator’s user-defined keywords field will show your keywords if you scroll through, but do not try to edit your longer-than-usual list in the GUI – if you need to edit the list again, go back to the manual edit and save and restart. Anecdotally, success has been reported with adding more than 100,000 keywords with more than 1,000,000 bytes total by manually editing the config file; you might even succeed getting more than that, depending on your memory and system performance.
The Save & Close button will save the settings and close the dialog. The Cancel button will exit the dialog without updating the style settings. The Transparency checkbox will allow you to apply transparency to the Style Configurator dialog box.
Global Styles
Unlike most of the other items listed in the “Languages” column, which are language or file-type specific, the “Global Styles” set the default stylings for all types of documents using the active theme. Except for the “Global override” style, a style for a particular language will override a “Global Style” setting.
Some of these styles apply to the background only, some apply to the foreground only, and some apply to both.
- Default style [background and foreground] ⇒ This sets the base font and colors for all languages – so any unstyled text will use these settings.
- As described previously,
Default Styleis used to set the color for Normal Text (.txtfiles, and anything else that isn’t highlighted by a lexer). - Also, as described a few paragraphs earlier, the highlighters for specific languages will inherit from this
Default Stylefor things like font and possibly color, if there is no value defined for that language.
- As described previously,
- Indent guideline style [background and foreground] ⇒ If View > Show Symbol > Show Indent Guide is checked, there will be a thin dotted line for every level of indent. The foreground sets the color of the dots; the background sets the color of the non-dot portion.
- Brace highlight style [background and foreground] ⇒ If you have text like
( blah )or[ blah ]or{ blah }and move the caret onto one of the opening or closing parentheses, brackets, or braces, both the opening and closing character in the pair will be highlighted per this style. - Bad brace colour [background and foreground] ⇒ If you have a single unmatched or mismatched parenthesis
(), bracket[], or curly-brace{}, with the caret at that character, it will be highlighted as a “bad brace style” instead of using the “brace highlight style”. - Current line background colour [background only] ⇒ The line containing the active editing caret will be marked using this background style. The “Go to settings” link will take you to Preferences > Editing so you can change Current Line Indicator.
- Selected text colour [background only] ⇒ Selected text will be indicated with this background. If Preferences > Highlighting > Smart Highlighting is checked, the “Smart Highlighting” style (below) will be colored overtop of the “Selected text colour”.
- In v8.0 - v8.7.9, if the configuration file
enableSelectFgColor.xmlexists, then Selected text colour will honor the foreground color as well. - In v8.8 and newer, if Settings > Preferences > Editing 1 >
☐ Apply custom color to selected text foregroundis checkmarked, then Selected text colour will honor the foreground color as well. - Otherwise, Selected text colour will only honor the background color setting, not the foreground color.
- In v8.0 - v8.7.9, if the configuration file
- Multi-selected text colour [background only] ⇒ Text selected in “multi-select” mode will be indicated with this background. (New to v8.6)
- Caret colour [foreground only] ⇒ This sets the color for the current-text-position caret, which will either be
|for insert mode or_for overwrite mode. The “Go to settings” link will take you to Preferences > Editing so you can change caret Settings. - Multi-edit carets colour [foreground only] ⇒ This sets the color for the current-text-position caret in multi-selection mode. (New to v8.6)
- Edge colour [foreground only] ⇒ Color for the vertical edge from Preferences > Margins/Border/Edge. If the Vertical Edge Settings are checked as Background Mode, this style’s “foreground” color will be used as the background color for text that’s beyond the edge. The “Go to settings” link will take you to Preferences > Margins/Border/Edge so you can change Vertical Edge Settings.
- Line number margin [background and foreground] ⇒ If Line Number > Display is checked in Preferences > Margins/Border/Edge, this sets the style for those line numbers. The “Go to settings” link will take you to Preferences > Margins/Border/Edge so you can change Line Number settings.
- Bookmark margin [background] ⇒ The background of the Bookmark margin will be set to this color, if the margin is enabled. The “Go to settings” link will take you to Preferences > Margins/Border/Edge so you can change Display Bookmark.
- Change History margin [background] ⇒ The background of the Change History margin will use this color, if the margin is enabled. (new to v8.4.6) The “Go to settings” link will take you to Preferences > Margins/Border/Edge so you can change Display Change History.
- Change History modified [background and foreground] ⇒ The Change History margin will show a bar with the foreground as the outline and the background as the center color for text that has been modified since the last save; the in-text change history underline will use the foreground color. (New to v8.6.5)
- Change History revert modified [background and foreground] ⇒ The Change History margin will show a bar with the foreground as the outline and the background as the center color for changes that have been undone since the last save and then edited to something different; the in-text change history underline will use the foreground color. (New to v8.6.5)
- Change History revert origin [background and foreground] ⇒ The Change History margin will show a bar with the foreground as the outline and the background as the center color for changes that have been undone since the last save; the in-text change history underline will use the foreground color. (New to v8.6.5)
- Change History saved [background and foreground] ⇒ The Change History margin will show a bar with the foreground as the outline and the background as the center color for text that has been saved since the last time it was modified this session; the in-text change history underline will use the foreground color. (New to v8.6.5)
- Fold [background and foreground] ⇒ If a given language has folding, this will give the color for the folding symbols (
⊞ ⊟ │ └) when the caret is not inside that folding-area. The “Go to settings” link will take you to Preferences > Margins/Border/Edge so you can change Fold Margin Style. - Fold active [foreground only] ⇒ If a given language has folding, this will give the color for the folding symbols (
⊞ ⊟ │ └) when the caret is inside that folding-area. The “Go to settings” link will take you to Preferences > Margins/Border/Edge so you can change Fold Margin Style. - Fold margin [background and foreground] ⇒ If a given language has folding, this will give the colors for the margin-region; it will be colored with a checkerboard-like pattern (a dense version of
░). The “Go to settings” link will take you to Preferences > Margins/Border/Edge so you can change Fold Margin Style. - White space symbol [foreground only] ⇒ If View > Show Symbol settings have whitespace shown, then the tabs and whitespace symbols will use this foreground color.
- Smart Highlighting [background only] ⇒ If Smart Highlighting is checked and active, this color will be applied to all matches. This background color has approximately 60% transparency compared to other backgrounds also applied on the same text, so the exact color seen will depend on other styles for this text, combined with this setting. (For example, if you have a highlight of green RGB=[0,255,0], with a white RGB=[255,255,255] background, the actual color will be RGB=[155,255,155].) The “Go to settings” link will take you to Preferences > Highlighting so you can change Smart Highlighting.
- Find Mark Style [background only] ⇒ If you have used the Search > Mark dialog to mark text, this style will be applied to the background. Like the “Smart Highlighting” style, this background has about 60% transparency, so the exact color seen will depend on other styles for this text, combined with this setting.
- Find status: Not found [foreground only] ⇒ The color for the Dialog-based searching error messages (for example, when search term isn’t found or regular expression isn’t valid).
- Find status: Message [foreground only] ⇒ The color for the Dialog-based searching result messages (for example, the number of occurrences found or replaced after a successful action).
- Find status: Search end reached [foreground only] ⇒ The color for the Dialog-based searching search-end-reached messages (for example, when the search or replace reaches the end of the document).
- Mark Style n (1 ≤ n ≤ 5) [background only] ⇒ If you select text, then use Search > Style All Occurrences of Token > Using nth Style, it will use this background color for all text matching the current selection. The “Go to settings” link will take you to Preferences > Highlighting so you can change Style All Occurrences of Token.
- Incremental highlight all [background only] ⇒ If you use the “Highlight all” feature of the Search > Incremental Search, the results will be colored based on this style.
- Tags match highlighting [background only] ⇒ If Preferences > Highlighting > Highlight Matching Tags is checked, this background color will be used for the opening and closing HTML/XML tags. The “Go to settings” link will take you to Preferences > Highlighting so you can change Highlight Matching Tags.
- Tags attribute [background only] ⇒ If Preferences > Highlighting > Highlight Matching Tags is checked, this background color will be used for attributes inside the HTML/XML tags. The “Go to settings” link will take you to Preferences > Highlighting so you can change Highlight Matching Tags > Highlight tag attributes.
- Active tab focused indicator [foreground only] ⇒ If Preferences > General > Draw a coloured bar on active tab is checked, this foreground color will be used for drawing a thick bar along the long edge of the tab name of the active tab in the active view.
- Active tab unfocused indicator [foreground only] ⇒ If Preferences > General > Draw a coloured bar on active tab is checked, and if both editor views are visible, this foreground color will be used for drawing a thick bar along the long edge of the tab name of the other inactive view’s active tab.
- Active tab text [foreground only] ⇒ Selects the color to be used for the filename displayed in the titlebar of the active tab.
- Note: Applying tab colors will take precedence over the color from this setting.
- Inactive tabs [background and foreground] ⇒ Foreground: selects the color to be used for the filename text displayed in all inactive tabs. Background: selects the color to be used to fill in the background of all inactive tabs.
- Note: for the background setting to affect the inactive tabs, Preferences > General** >
☐ Darken inactive tabsmust be checkmarked; otherwise, inactive tabs will use the same background color as the active tab instead of using the background color defined here. - Note: Applying tab colors will take precedence over the color from this setting.
- Note: for the background setting to affect the inactive tabs, Preferences > General** >
- Tab color n (1 ≤ n ≤ 5) [background only] ⇒ Selects the color to be used for the Tab Bar > Apply Color to Tab actions, for Light Mode. When a tab-color is applied to a tab, these take precedence over the active and inactive tab color settings in Light Mode. (Added v8.7)
- Tab color dark mode n (1 ≤ n ≤ 5) [background only] ⇒ Selects the color to be used for the Tab Bar > Apply Color to Tab actions, for Dark Mode. When a tab-color is applied to a tab, these take precedence over the active and inactive tab color settings in Dark Mode. (Added v8.7)
- URL hovered [foreground only] ⇒ If Preferences > Cloud & Link > Clickable Link Settings > Enable is checked, when your mouse cursor is hovering over a URL, or if the caret is inside the URL text, then the URL’s foreground color will follow this setting. The “Go to settings” link will take you to Preferences > Cloud & Link so you can change Clickable Link Settings.
- Document map [background and foreground] ⇒ The foreground color will be semi-transparently overlayed over the miniature version of text that’s currently visible in the editor; the background color will be semi-transparently overlayed over the miniature version of the text that isn’t currently visible in the editor (this style is new to v8.1.5).
- EOL Custom Color [background and foreground] ⇒ Sets the colors for the
CR,LF, andCRLFindicators, which are also influenced by the Settings > Preferences > Editing > EOL settings. The “Go to settings” link will take you to Preferences > Editing so you can change EOL settings. - Non-printing characters Custom Color [background and foreground] ⇒ Sets the colors for the symbols for the Non-Printing Characters, which are also influenced by the Settings > Preferences > Editing > Non-Printing Characters settings. The “Go to settings” link will take you to Preferences > Editing so you can change Non-Printing Characters settings. (Previously labled as NPC Custom Color.)
- Global override [background and foreground] ⇒ This style has a series of checkboxes, which allow you to choose which attributes of the override-style will apply to everything; any that are checked will override even the per-language settings; any that are not checked will not use the global-override settings for that attribute.
- Global override takes precedence over any other color or font defined elsewhere, and will mask any per-language settings.
- Unless you want to turn off all syntax highlighting for all the programming languages, you likely don’t want to use the
Global overridesettings. - Do not use this if all you are trying to do is set the color for Normal Text files (
.txt): for those, use theDefault style(above, at the start of this list of Style entries). - Starting in v8.7.1, there is a
What is Global override?link which you can hover over to find out more about the global overrides; and new installations and new portable copies will have Global override at the end of the list of Global Styles instead of the beginning, to better emphasize that Global override is more drastic than you usually need.- If you upgrade from an older version of Notepad++ to v8.7.1 or newer, the Global override will not necessarily be moved to the end of the list.
- In such a case, or even if you are in an older version of Notepad++, you can edit
%AppData%\Notepad++\stylers.xml(or your active theme file) following the advice for editing configuration files, and move the<WidgetStyle name="Global override" ... />element from the top of the<GlobalStyles>section to the end of that section; after saving, exiting Notepad++, and restarting the app, Global override will be moved to the end of the list.
Search result styles
The “Search result” styles are another set of styles which are not language or file-type specific. Instead, they are the styles that are applied in the Search > Search Results Window.
Some of these styles apply to the background only, some apply to the foreground only, and some apply to both.
- Search Header [background and foreground] ⇒ The first line of every group of search results telling what search term was used, how many matches there were, and how many of the searched files contain matches is affected by this style.
- File Header [background and foreground] ⇒ For each file in a group of search results, the file name and how many matches were in that file, are affected by this style.
- Line Number [background and foreground] ⇒ For each line with a match, the line number of that match will be formatted according to this style.
- Hit Word [background and foreground] ⇒ The matching word will be formatted using this style inside the search results.
- Current line background [background only] ⇒ As you click on lines in the search results window, this style will be used to set the background color of the search-result-window line that was clicked.
Configuration file: stylers.xml
If you prefer to edit XML instead of using the GUI, you may use the stylers.xml configuration file to edit the default theme, or themes\blah.xml to edit theme “blah”.
The <LexerStyles> section contains a <LexerType> tag for each programming language – where the desc= attribute matches the name in the list of Languages from the GUI. Each of those contains one or more <WordsStyle> tags, where the Name= attribute matches the entries in the GUI’s list of Styles for that language; the WordsStyle are usually empty tags (<WordsStyle .../>), but can contain values (<WordsStyle...>user1 user2 ...</WordsStyle>) if there is an associated list of user-defined keywords for that style. (If the language’s lexer is not programmed to make use of extra keywords for a given style, filling in values there will not make those keywords styled; the lexer must be programmed to use the user-defined keywords for that to work. You can tell whether a lexer will handle user-defined keywords for a given style if the Style Configurator shows a User-defined Keywords box for the given lexer language and style.)
There is also a <GlobalStyles> section, with <WidgetStyle> entries corresponding to the elements of the “Global Styles” in the GUI.
Common Syntax Highlighting Problems
If you find no syntax highlighting to be applied when a particular programming language is selected from the Languages menu, check which theme you are using in the Style Configurator dialog. If your selected theme does not include settings for a given programming language, it cannot apply the highlighting. You can edit the theme’s XML file, pasting in the appropriate <LexerType> from a different theme (or the default stylers.xml) into your theme file; save the file, exit and reload Notepad++; now, the language should be listed in your theme’s Style Configurator languages list, and you should be able to set the colors to match the other languages in your theme.
If you change a color in your Style Configurator, but the color doesn’t change in the editor, it may be that you don’t have the right language lexer selected: In the main Notepad++ window, the lower-left of the status bar will list the active lexer, or you can check the Language menu for which entry has the • to indicate it’s selected.
Shortcut Mapper
The Shortcut Mapper allows mapping specific key-combinations to specific actions inside Notepad++. Starting in v8.7.6, the Shortcut Mapper will allow using the keys unique to the keyboard that was active when Notepad++ was started, and will properly display the character associated with that key (if the keyboard is changed, Notepad++ will have to be restarted to recognize the new keyboard); in all earlier versions, the only keys available were those from the en-US keyboard, and if the active keyboard had a different character associated with a given keycode, the en-US character shown in Notepad++ would be different from the key actually pressed on the keyboard for keyboard-specific keys.
The Shortcut Mapper dialog presents five tabs:
Main menu: Used for items in the main Notepad++ menu items, like File, Edit, Search, View, Encoding, Language, Settings, Run, and ? (Help/About) menus.Macros: Used for items in the Macros menuRun commands: Used for user-added items in the Run menu. (The Run… menu entry shortcut is defined in theMain Menutab)Plugin commands: Used for actions from the Plugins menu.Scintilla commands: Used for editing shortcuts for the various editor commands – the things that happen inside the main text-editing portion of Notepad++ (navigating through the text, selecting text, copy/cut/paste, and other such editing actions; these use the “Scintilla” library internally, hence the name of this tab).
Each tab consists of an area for selecting the command to shortcut, a message area, a Filter input, and buttons to Modify, Clear, Delete, and Close.
When selecting the command, there are generally two columns: Name and Shortcut. The Name matches the menu item (or the name of the Scintilla message). The Shortcut shows the current-assigned shortcut (if any). The Main menu tab has an additional Category column, which tells which menu category the command falls under. The Plugin commands tab has an additional Plugin column, which tells which plugin DLL the shortcut applies to.
The message area will tell you if there are “no shortcut conflicts for this item” (when the shortcut for the selected action is not used anywhere else; or it will give you the name of the tab, followed by the Name for the action, which uses the same shortcut as the currently-selected action.
The Filter input box allows you to enter a piece of literal text, and it will filter all the Names in the active tab for a given text substring, only listing the Names that contain that literal substring, ignoring case. (Starting in v8.1.3, this also filters based on Shortcut, except for Scintilla commands tab; starting in v8.6.5, the shortcut filters also work on Scintilla commands.) There are no regular expression or wildcard syntax interpretations in the Filter.
Starting in v8.6.5, when you type multiple space-separated character sequences (“tokens”) as your Filter, it will try to match each token separately, in the same entry. When filtering, it will search all the displayed fields for the dialog (whether in “Name” or “Shortcut” or “Plugin” column). All of the tokens must be matched somewhere in the entry, but they can be in any order. Some examples:
Shortcut Mapper > Plugin commands
| Name | Shortcut | Plugin | Filter | Match? |
|---|---|---|---|---|
| do thing | Alt+G | BlahLint | lint do + |
Yes (lint from Plugin, do from Name, + from Shortcut) |
| do thing | Alt+G | BlahLint | +G thing blah |
Yes (+G from Shortcut, thing from Name, blah from Plugin) |
| do thing | Alt+G | BlahLint | lint foo +G |
No (foo not in any field, despite lint in Plugin and +G in Shortcut) |
Shortcut Mapper > Scintilla commands
| Name | Shortcut | Filter | Match? |
|---|---|---|---|
| foo baz | Alt+H or Ctrl+Shift+Q | baz or |
Yes (baz from Name, or from Shortcut) |
| foo baz | Alt+H or Ctrl+Shift+Q | +q foo |
Yes (+q from Shortcut, foo from Name) |
| foo baz | Alt+H or Ctrl+Shift+Q | +q +z |
No (+z not in any field, despite +q in Shortcut) |
| foo baz | Alt+H or Ctrl+Shift+Q | baz tab |
No (tab not in any field, despite baz in Name) |
Shortcut Mapper > Main menu or Macros or Run commands
| Name | Shortcut | Filter | Match? |
|---|---|---|---|
| cute kitty | Alt+K | alt k |
Yes (alt from Shortcut, k in both Name and Shortcut) |
| cute kitty | Alt+K | kit alt |
Yes (kit from Name, alt from Shortcut) |
| cute kitty | Alt+K | cute q |
No (q not in any field, despite cute being in Name) |
Use the Modify button to edit the existing shortcut or to create a shortcut for an entry that has none. The resulting dialog will show the Name of the active action. There are checkboxes to enable the Ctrl, Alt, and Shift key-modifiers. The main key in the shortcut is defined by the pulldown menu. Hitting OK will apply the added or changed shortcut and leave the dialog. Cancel will undo your changes and leave the dialog. (Please note that if you are using some localizations, the key you select might not match-circumflex-key-for-a-shortcut/10) what key you type: whatever key in your locale uses the same keycode as the standard US English keyboard will be the actual key.)
In the Scintilla commands tab, you can actually assign more than one shortcut to a given Scintilla command, so there is an extra pane listing existing shortcuts, and additional Add and Remove buttons. For more on the meaning of the SCI_xxxx names in the Scintilla commands tab, see the section on Other Editing Commands and Shortcuts.
For entries on all the tabs except the Scintilla commands tab, the Clear button can be used to remove the existing shortcut for the selected entry. Alternatively, you can click the Modify button in the Shortcut mapper main window and then select None from the pulldown in the Shortcut window that appears, and choose OK to finish.
For entries on the Scintilla commands tab, the Clear button is disabled and will not work; instead, select Modify to get into the mode that allows you to edit Scintilla commands shortcuts: if there are multiple shortcuts listed in the left pane, click on the shortcut you wish to remove, and click the Remove button; if there is only one shortcut remaining in the left pane, click on it, choose None from the key-combo pulldown menu on the right, then click Apply. Either way, when done deleting shortcuts from this command, hit OK to finish.
The Delete button is usually disabled (greyed out). However, in the Macros and Run commands menu, the Delete button will be enabled (not greyed out), and clicking it will remove the selected entry from the menu – so it will not only not have a shortcut, but it won’t be in the menu the next time you run Notepad++.
The Close button will close the dialog box.
Please Note: Notepad++ honors standard Windows behavior with keystrokes for menu accelerators: typing Alt with the first letter (or underlined letter) for a main menu entry will open that menu. If you want to define Alt+_Letter_ for some other action, you may do so using the Shortcut Mapper, and that accelerator will no longer work for the menu, but will instead access the action you mapped it to; undefining that new Mapper entry will allow Windows to treat that sequence as the accelerator again. Shortcut Mapper cannot change or clear the Windows accelerator for a menu entry – it can just preempt that accelerator key to use for something else. (Because the X on the right of the menu bar, which closes the active tab, was created as a menu action on the main menu bar with the name “X” through version 8.4.2, its accelerator was therefore Alt+X; in v8.4.3, the name was changed to the symbol “✕” instead, so Alt+X will no longer activate that action; if you would like to make Alt+X work on v8.4.3-and-newer, you can go to the Main menu tab in the Shortcut Mapper and change the Shortcut for Close to Alt+X instead of the default Ctrl+W.)
Available Keys
Starting in v8.7.6, the character pulldown list for Shortcut Mapper keys will list the normal ASCII characters; it should also recognize whatever keyboard was active when you started Notepad++, and for the keys unique to your location (be it US-english or French or Brazillian Portuguese or what have you), it should list any of those keys that are available for mapping in shortcuts. (If you can switch between multiple keyboard configurations in your version of Windows, Notepad++ will use whichever layout was active when Notepad++ was run, so if you want to switch keyboards, you will have to exit Notepad++, switch the keyboard setting, then restart Notepad++.)
Prior to v8.7.6, the character pulldown for Shortcut Mapper keys mostly matched a standard US keyboard (excepting the <> key, which US keyboards don’t generally have). It’s not actually that character that maps to Shortcut Mapper shortcut, but the underlying keyboard scancode, and how it maps to the Windows Virtual Key. The Community Forum has a FAQ which shows the full “Virtual Key” vs “US key description”, showing which are available to the shortcut mapper (and which shortcuts are by default assigned to an action in Notepad++). The FAQ also lists the equivalent keyboard keys for some major keyboards (including French, German, and Portuguese), and provides links to possible external websites that might help you figure out the mapping for your own keyboard. (The pre-v8.7.6 was more confusing, because the shortcut listed in Notepad++ shows a different key than you actually have to type on your non-US keyboard; if this confuses you, it is highly recommended to upgrade to a newer Notepad++, so the Shortcut Mapper matches your active keyboard.)
Configuration file: shortcuts.xml
If you prefer to edit XML instead of using the GUI to modify shortcuts, you may edit the shortcuts.xml file. The keyboard shortcuts are defined as attributes of the <Macro>, <Command>, <PluginCommand>, and <ScintKey> tags. The Key= attribute is the decimal value for the keycode associated with the key you want to hit. The Ctrl=, Alt=, Shift= attributes have values of either “yes” or “no”, and either enable or disable the modifier for that key.
Common Shortcut Mapper Problems
With the introduction of the message area, it is easy to see when a conflict exists between shortcuts. All you have to do is pick the entry that you don’t want to use the conflicted shortcut, and either Clear or Modify the shortcut so there is no longer a conflict.
Other Toggles and Settings
Not all preferences are handled in dialogs, and those toggles and settings are described here.
Other Settings-menu Entries
-
Settings > Import > Import Plugins… will ask you to navigate to a plugin DLL anywhere on your filesystem; it will then copy that DLL into the appropriate folder so that the next time you run Notepad++, the application will load that DLL as a plugin (assuming it is a valid plugin DLL). This is an alternate way to install a single-DLL plugin, rather than the other installation methods of using Plugins Admin or manually putting the DLL and associated files in the right location. (This menu entry will not work on its own if the plugin requires more files than just its DLL.)
-
Settings > Import > Import Style Themes… will ask you to navigate to a style theme XML file, and will put it in the appropriate folder so that the next time you run Notepad++, the application will include it when you use the Style Configurator. The new theme will be listed in the “Select theme:” pulldown.
-
Settings > Edit popup ContextMenu will open the
contextMenu.xmlconfiguration file, so that you can edit your context menu, following the advice for editing configuration files.
Preference Toggles in Other Dialogs
-
The Save Session dialog will have a
☐ Save Folder as Workspacecheckbox, which will be active (able to be toggled) when you have a Folder as Workspace opened. If the checkbox is checked, the current Folder as Workspace will be included in the saved session; otherwise, the session will not include any Folder as Workspace information. -
When saving a new file or otherwise running the Save As dialog, there is an
☐ Append extensioncheckbox. If checked, Notepad++ will automatically append the first extension listed in the selected Save as type; otherwise, the extension must be manually included in the File name field.
Menu-based Settings
The following are settings or preferences that are stored and modified by menu entries rather than dialog boxes.
View Menu
The View menu contains many toggles that affect Notepad++, many of which decide whether certain features of the application are visible or not. Some of these that are remembered from one run of Notepad++ to the next (similar to dialog-based settings), and others that are specific to the current run of Notepad++. These toggles and actions are described more in the Views section of this manual.
Encoding Menu
These entries influence the file encoding of the active file – how the underlying bytes of the file are interpreted as glyphs, and how the characters you enter are saved as underlying bytes. The New Document preferences will influence which Encoding is selected for a new file, and the MISC > Autodetect character encoding preference will affect what encoding will be selected when the file is first read from disk.
There are the major encodings found at the beginning of the Encodings menu:
ANSI: A family of 8-bit encodings based on the active Windows Code Page. Whatever code page your OS is set to use (and thus the one that shows up in the ?-menu’s Debug Info asCurrent ANSI codepage), that is what theANSIencoding refers to. (It was named generically, because historically, people have thought of their default codepage as the “ANSI” codepage. In the US, that code page is usually Windows-1252, but it depends on your Windows settings.)UTF-8: This encoding uses variable-width multi-byte sequences to represent Unicode characters, either without or with the BOM character at the start of the file. (The BOM isn’t technically part of the UTF-8 spec, because there isn’t a Little Endian or Big Endian variant of UTF-8 – the bytes are always in a predefined order. However, many applications use the BOM codepoint to indicate that the file should be interpreted as UTF-8, and Notepad++ supports reading and writing the file with the BOM sequence to support those external applications file-format needs.)UTF-16: This encoding uses two-byte Big Endian or Little Endian sequences to represent Unicode characters.- The various
Character setsfound in the sub-menus allow you to specify any of the various international 8-bit sets of characters that provide a limited set of less than 256 glyphs, rather than the full suite Unicode character. You can use one of these encodings to be able to edit a file from one character set, even if your Windows code page is at a different code page. For example, this allows you to edit a file using the Eastern European ISO 9959-2 character set even if your copy of Windows is setup for Windows 1252.
The ... with BOM entries indicate that it uses the Unicode Byte Order Mark at the start of the file to indicate the correct byte order (big endian or little endian), and in the case of UTF-8, to make it unambiguous that the file is meant to be a UTF-8 Unicode file rather than another 8-bit encoding.
The Convert to ... entries below the separator line will change the encoding (the underlying bytes stored on disk) of the active file, without changing the glyphs. So if you just have the Euro currency symbol € in your file, it will be stored as byte 0x80 if you Convert to ANSI (and are in a Western-European codepage in Windows), as the three-byte sequence 0xE2 0x82 0xAC if you Convert to UTF-8, and as the two byte sequence 0x20 0xAC if you Convert to UTF-16 BE BOM.
The entries above the separator line (without Convert to in the name) show the file’s active encoding or character set. If you change that setting manually, it will leave the bytes in the file the same and change the glyph or glyph sequence that is shown, based on the updated interpretation of the bytes. For example, if you enter the € in a UTF-8 encoded file, and then manually select Encoding > ANSI, suddenly those characters will look something like € (depending on the active Windows code page); this is because UTF-8 € is the three bytes 0xE2 0x82 0xAC, and those three bytes represent three characters when interpreted as ANSI. Or, if you are starting with a character set of Western European > OEM-US (the old DOS box-drawing character set) with the ▓ grey box, if you change to character set to Western European > Windows-1252, it will become the ² superscript 2.
In general, if you want the glyph to stay the same and change the bytes on the disk, then use the Convert to... entries; whereas if the glyphs shown don’t match what you think the bytes of the data should represent, you probably need to use one of the upper entries to change the interpretation of the bytes.
Language Menu
This menu shows the active syntax highlighter lexer (including User Defined Languages), and allows you to change the syntax highlighter for the current file. The syntax highlighting colors are set in the Style Configurator or in the UDL dialog.
Preferences for Advanced Users
The following settings are for rather specific needs and could cause some confusion if they are changed from default behavior. As a result they are not set via UI but in config.xml. Note that you should close Notepad++ then edit config.xml following the best practices in the Editing Configuration Files section to prevent your modification from being erased or overwritten when Notepad++ exits.
-
Allow regex backward search: Backward regex searching is forbidden by default due to sometimes surprising results. However, if this feature is needed, you can set
regexBackward4PowerUserattribute toyesin theFindHistorytag ofconfig.xmlto enable this option:<FindHistory nbMaxFindHistoryPath="10" nbMaxFindHistoryFilter="10" nbMaxFindHistoryFind="10" nbMaxFindHistoryReplace="10" matchWord="no" matchCase="no" wrap="yes" directionDown="yes" fifRecuisive="yes" fifInHiddenFolder="no" fifFilterFollowsDoc="no" fifFolderFollowsDoc="no" searchMode="0" transparencyMode="1" transparency="150" dotMatchesNewline="no" isSearch2ButtonsMode="yes" regexBackward4PowerUser="yes">Simply add
regexBackward4PowerUser="yes"if this option is absent. -
Change the number of expressions that can be saved in the Find/Replace dialog’s Find, Replace, Filters, and Directory fields. They are set in the
<FindHistory ...>tag insideconfig.xml, using the attributes:nbMaxFindHistoryFind=> changes the number of Find what entries that are saved in the history (0 .. 30, default = 10)nbMaxFindHistoryReplace=> changes the number of Replace with entries that are saved in the history (0 .. 30, default = 10)nbMaxFindHistoryPath=> changes the number of Directory entries that are saved in the history (0 .. 30, default = 10)nbMaxFindHistoryFilter=> changes the number of Filter(s) entries that are saved in the history (0 .. 20, default = 10)
-
Make the Find in Files Filter field automatically populate based on the file type / extension of the current file when you launch the dialog. This can be set by changing the
<Find History ...>tag insideconfig.xml, using the attributefifFilterFollowsDoc: set it tofifFilterFollowsDoc="yes"to make Notepad++ automatically populate that Filter field every time you launch the Find in Files dialog (however, you can override that filter by typing a new filter; and changing the active tab or opening a new file after the dialog is already shown will not update that field automatically); if it is set tofifFilterFollowsDoc="no"(default), then the Filter field will not change when you launch Find in Files, and will instead remember the last value you entered into the field (if any). -
Changing the command-line interpreter used: By default, File > Open Containing Folder > cmd will launch the
cmd.execommand-line interpreter. If you have a preferred command-line interpreter (such aspowershell), you can add another<GUIConfig...>tag inside the<GUIConfigs>section:<GUIConfig name="commandLineInterpreter">powershell</GUIConfig>If your command-line interpreter is not in your path, make sure to include the drive and folder in the contents of that tag. If there are spaces, make sure to use quotes around the path:
<GUIConfig name="commandLineInterpreter">"C:\path\with spaces\to\cli.exe"</GUIConfig> -
Control whether tab coloring follows theme or not:
- By default, in Light Mode, the tab colors will follow the theme’s settings for Settings > Style Configurator > Global Styles > Active tab text foreground and Inactive tabs foreground and background colors; in Dark Mode, the tab colors will not follow those settings (because many users use Dark themes that don’t set that color, which would mess up the user interface for those users, and they wouldn’t be able to fix it, because the style wouldn’t be listed in the theme).
- There are two hidden settings in the Dark Mode section of the XML (new in v8.4.8):
<GUIConfig name="DarkMode" ... darkTabUseTheme="no" ... lightTabUseTheme="yes" />darkTabUseTheme="no"(default) or"yes": If"no", Dark Mode will ignore those two style settings for tab colors; if"yes", Dark Mode will use those two style settings for tab colors.lightModeUseTheme="yes"(default) or"no": If"no", Light Mode will ignore those two style settings for tab colors; if"yes", Light Mode will use those two style settings for tab colors.
- Also, the
darkTabIconSetandlightTabIconSetattributes in that same tag (not shown) both have hidden option values available.- In the GUI, Settings > Preferences > General > Tab Bar >
☐ Alternate iconscan be used to set whether you want the the alternate icons or not. - But by manually editing these attributes in the XML, you can also force it to use the icon set defined by the opposite mode (use the light icon set in Dark Mode, or the dark icon set in Light Mode). Values can be
"0"value for light icons,"2"for dark icons and,"1"is for alternate icons.
- In the GUI, Settings > Preferences > General > Tab Bar >